Four lanes of cross-river road capacity are a great thing, but the demand for that roadspace causes chronic problems at each end. The original 1930s termini involved a small number of toll booths and a free-for-all with the surrounding roads, and by the 1960s this was completely inadequate.
It being the sixties, the solution was to call in the concrete mixers and start drawing up some really groovy new flyovers to go at both ends of the tunnel. It was impossible to miss the fact that a whole new tunnel was being built to the north to relieve the Queensway, but that doesn't seem to have stopped a remarkable scheme to demolish huge areas of Birkenhead.
Unblocking Birkenhead
By the early 1960s, it was becoming clear that the Queensway Tunnel was carrying much more traffic than had ever been envisaged when it was first opened. In just thirty years it had become thick with cars and lorries throughout the day. The problem came in two parts: the capacity of the tunnel, which was set at four traffic lanes; the bottlenecks along its route, those being the two junctions inside complete with traffic signals; and the toll booths at each entrance.

The capacity issue was slowly being addressed with the planning of the second tunnel — what eventually became the Kingsway Tunnel further north. It was generally agreed that the bottlenecks had to be fixed regardless of this as the Queensway would continue to struggle with its traffic problems even once it was relieved further north. The Kingsway was more for long-distance traffic, and traffic for Birkenhead itself would probably continue to use the old route.
For one thing, the junctions inside the tunnel were remodelled. The Liverpool spur became exit-only, allowing traffic from Birkenhead to opt for the Dock exit or the Haymarket exit. The Birkenhead spur to Rendel Street was closed completely for the simple reason that its traffic signals were a liability and caused unjustifiable delays.
A bill was set before Parliament and consultants were called in to examine the problem in 1965. Brian Colquhoun and Partners, one of the engineering companies involved in the construction of the tunnel itself, were appointed and set to work. They reported back in August 1966 and the final plan involved some major changes.
- Toll facilities would be streamlined and, because of the higher land prices in Liverpool, all tolls would be collected at a single site at the Birkenhead end of Queensway.
- Traffic entering and exiting the tunnel would be segregated and the local road network in Birkenhead town centre would be re-engineered to allow free movement from the major radial routes to the tunnel mouth stopping only for the toll.
- To alleviate rush hour congestion towards Liverpool, marshalling areas would be created where traffic queues would be computer-controlled and congestion would not spill onto the surrounding streets.
In practice, this meant clearing a large area of central Birkenhead — including more than 170 homes, 90 shops, 23 factories and 14 pubs — and replacing it with vast open areas of tarmac and two kilometres of new elevated and tunnelled roads. The construction works lasted two years and four months, including the complete renovation of several railway tunnels underneath, with the computer controlled queueing system set up in a separate contract running for a further year. The scheme was opened to traffic in July 1969.

The new road layout used huge lengths of elevated roadway to allow all traffic entering or exiting the tunnel to get to and from each of the three major approaches without conflicting with any other traffic. As a system it's almost too zealous in its determined separation of traffic flows.
Given the many town streets that vanished beneath its tarmac, the scheme also included a new bypass route across the south, connecting the A41 and A552. This short road has its own number — A5227 — and is rather unusual in being just 0.48Km in length and elevated for its entire duration.
In the early 1990s, Birkenhead's town centre was undergoing massive regeneration works and the enormous toll plaza could hardly be excluded from this. The main target was actually the flyover leading to the A553 to the northwest, which came uncomfortably close to the main shopping area. It was demolished and replaced with two surface-level roundabouts, and with it went the long, thin elevated road running diagonally north-westwards across the complex. There's now just a little stub to show where it used to start. This has the unfortunate side effect that there's no direct way from the tunnel to the main shopping area, and traffic wanting to do this now has to go north on the A554 instead.
Keeping traffic moving
With the toll facilities all located at the Birkenhead end of the tunnel, there wasn't much that could be done for afternoon rush hour queues, which built up inside the tunnel itself. This wasn't really seen as a problem, though, because the point of the new system of flyovers was just to get tunnel queues off the streets of Liverpool and Birkenhead. They didn't actually do very much to reduce the queues beyond providing a much larger number of toll booths.
For traffic entering at Birkenhead, there was scope to stack up the waiting traffic more efficiently and this was to be done by a new and innovative computer-controlled system.

It was quite simple: traffic was funnelled into one of two marshalling areas which both led to the toll plaza. Each marshalling area was split into lanes. There was an overhead signal gantry running across the width of both marshalling areas at both the entrance and exit point of every lane, capable of showing a red cross or a white arrow.
On approaching, the motorist could take any lane showing a white arrow at the entrance and join the queue in that lane. The exit from all lanes was blocked by red crosses. The computer system would then allow a small number of lanes to proceed by showing them a white arrow, and at the same time block the entrance to those lanes with a red cross. Once a lane was empty it was allowed to fill up again from the back and other lanes were allowed to proceed to the tolls.
There was an inherent flaw with this scheme, which was that any regular user would quickly realise that the lanes were released in a sequence and would learn to join whichever lane was next to be released. The less scrupulous could always simply join an open lane and move across into one being released.
It didn't really matter; the system was installed in 1970 but never really worked properly. The computer system failed at its job quite miserably, and it was rapidly becoming clear that the new Kingsway tunnel to the north was clearing many of the Queensway's problems. By the time the queuing system was built and active, the epic congestion it was designed for had gone.
Liverpool dreams
At the other end of the tunnel, Liverpool had fewer problems to solve. With the congestion generated by the toll booths moved to the other side of the Mersey, its only concern was to get traffic flowing smoothly in and out of the tunnel mouth. By the late 1960s the city already had well-developed plans for an urban motorway scheme (the Liverpool Inner Motorway is detailed in another article) and the tunnel mouth had to connect to this.
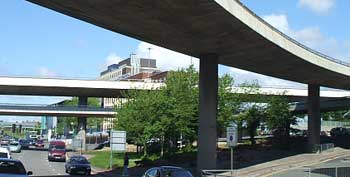
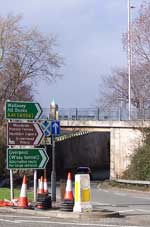
Today the tunnel emerges at a small roundabout, and the area is relieved of through traffic by the twin Churchill Way flyovers connecting Islington to Dale Street and Great Crosshall Street. The original 1960s plan was for the tunnel to free-flow onto Byrom Street, which would become a motorway radial to the north of the city, interchanging with theLIM, with no real connections between the tunnel mouth and the LIM interchange.
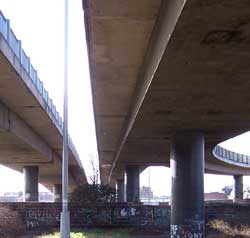
The LIM, and the rest of the ambitious motorway schemes, were never built. The Churchill Way flyovers remain a white elephant, connecting to nothing of any great importance, but they are the only surviving relic of a formidable plan.
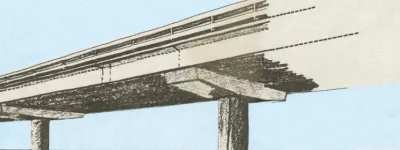
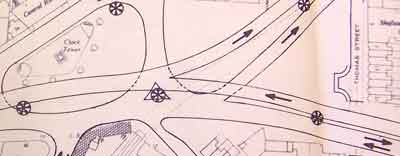
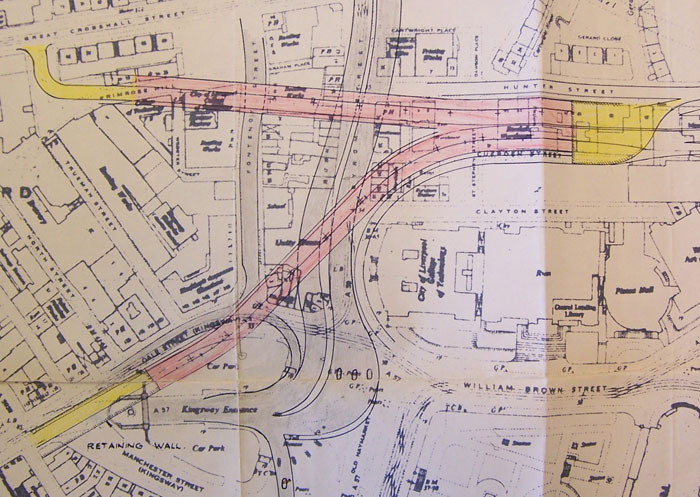
To the right is one plan for the flyover system (click it to see a larger version). It is undated but it's safe to assume that it predates the Birkenhead flyover system because it has provision for toll booths on the Liverpool side. The two Churchill Way flyovers are clearly shown, and the accompanying correspondence is very excited about the fact that they are innovative double deck structures, with a pedestrian walkway beneath the road surface. This is visible in the background of the photo above.
You can download the booklet that accompanied the opening ceremony for the Birkenhead flyover scheme, with much more detailed information, in PDF format here.
Picture credits
- Photograph of Birkenhead traffic congestion taken from the 'Birkenhead Mersey Tunnel Approaches Scheme 1969' opening booklet.
- Engineer's sketch of signalling system taken from an original pen sketch in the consultants' design documents held at the National Archives, and recoloured from black and white.
- Photograph of Churchill Way flyovers by Bryn Buck and used with permission.
- Plan of Liverpool tunnel mouth redevelopment taken from an original held at the National Archives.